MySQL Router with InnoDB Cluster allows transparent routing access for application to backend MySQL Servers.
Restful API (Http access) feature was added to MySQL Router since 8.0.17.
This article is written to provide a tutorial with Router Restful API. It is tested with MySQL 8.0.29 release.
Setup& Assumptions
1. MySQL InnoDB Cluster 8.0.29 - Cluster Name as 'mycluster'
2. Linux OS with MySQL Shell 8.0.29 installed
3. Restful API User : 'myapiuser'
Router Configuration
Bootstrap is the process to create the Router configuration setup.
e.g.
$> mysqlrouter --bootstrap admin:adminPassword@node1:node1Port --directory /tmp/myrouter --account routerfriend --account-create always
The /tmp/myrouter directory is created with the configuration, keys and scripts.
The mysqlrouter.conf is defined with the following settings. The rest API settings with 8443 is enabled by default.
---
[http_server]
port=8443
ssl=1
ssl_cert=/tmp/myrouter/data/router-cert.pem
ssl_key=/tmp/myrouter/data/router-key.pem
[http_auth_realm:default_auth_realm]
backend=default_auth_backend
method=basic
name=default_realm
[rest_router]
require_realm=default_auth_realm
[rest_api]
[http_auth_backend:default_auth_backend]
backend=metadata_cache
[rest_routing]
require_realm=default_auth_realm
[rest_metadata_cache]
require_realm=default_auth_realm
---
Router Account Setup
The authentication is configured as 'backend=metadata_cache' under the mysqlrouter.conf
[http_auth_backend:default_auth_backend]
backend=metadata_cache
3. The user 'myapiuser' can be dropped.
mysql> DROP USER myapiuser;
Accessing Restful API via Browser (Chrome Browser as an example)
The Restful API http port is opened as 8443. The swagger.json can be accessed via URL : https://<MySQL Router IP>:8443/api/20190715/swagger.json
/api/20190715/ - It is the API Base Path.
It also shows the list of "Paths" where you can access thru the API base path.
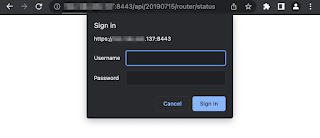
To get access to the details, user/password is required to get access to.
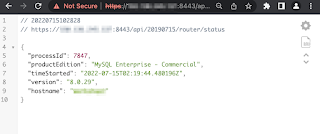
For example, to check with Router Status - https://Router IP:8443/api/20190715/router/status
Putting in user/password as created previously in Router Account Setup can access to the status as shown :
You can try other Restful API and getting connection, metadata and routes details.
Enjoy!
References:
https://dev.mysql.com/doc/mysql-router/8.0/en/mysql-router-rest-api-setup.html
https://dev.mysql.com/doc/mysql-router/8.0/en/mysql-router-innodb-cluster.html
https://dev.mysql.com/doc/relnotes/mysql-router/en/news-8-0-17.html
https://dev.mysql.com/doc/mysql-router/8.0/en/mysql-router-deploying-bootstrapping.html


No comments:
Post a Comment